Monday 10 January 2011

Production and Outcomes 'influences and reactions' (Week 7)

As a practitior you would have to learn about interpretating your work has it has been found that many pieces of work have been edited as the years went on. Artists enterpret their work by using the zeigeist method. This is where it depends on the time and place of a piece of work to what it looks like. There could of been a piece of work made by one artist, that has then been interpreted by a different artist.
For example with these Alice in Wonderland images by Lewis Caroll.
In this original image i can see that there is a lot of emotion in it. The image looks quite old so you can tell that it is an original. This example differs from the ones created now, The Disney versions in a lot of many ways. The facial expressions on the original version vary from the newer version as they seem angry and the media they have used to create it, the dark lines help to assist the angry theme. Whereas if the designer was trying to create a happy feeling in the picture and they used this dark line work it wouldnt really work.
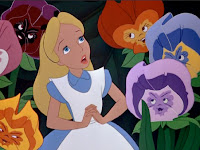
This image has been interpreted in a more modern way to fit with the more modern times and so it looks good in a film. For example in this picture to the right.
This imaeg has been changed by making the colours brighter to interested the audience (children) more. As i feel that the original version wouldnt of attracted many people of my time. There are facial expressions present on this image but they are more shocked than angry. The main way this image has been interpreted is through the changes and quality of colour over time. This shown in the image below.
The colours are stronger than the oringial but doesnt look as good as the more modern version.


Testing
All artists test their work and show it to people before its published using blogs and then it goes into galleries. The blog helps the artist to get feeback on their work so they can improve and make it better.
This is an example of a blog which links with the artists i have used in my thrid project.
This is Tim Marrs Blogs and enables the audience to comment on his work.

Saturday 8 January 2011

Production for vis-com week 10

The experts
Here is a list of experts which i know about: Zuzana Licko, Erik speikermann, Chris Ware, Stefan Sagmeister, Paul Rand, Neville Brody, Jonathan Barnbrook and Malcolm Garett.
My favourite expert would be Paul Rand becasue when i looked at his work his typography and the way he lays them out attracted me straight away. I think he stands out more from the other experts because of his originality of his work and that he does use typography but he also combines images in this too whereas the other artists mainly just focus on big lettering taking up all the page.
These examples show his work and i find that he uses a cartoon like theme and i find this looks interesting and fits in with modern day. I find it good how he can change basic shapes into a recognisable image.


 I find Paul Rand better because i found that when i looked at all the other artists work it didn't really appeal to me as it looked quite dated.
For example:

 Paul Rand has more experimentation with his colours and he knows how to make things stand out more, for example by putting bright coloured images to a black background. He has made this look effective.


Brief history of production
right about how there has been a big jump in time. describe images
Throughout time, there has been a major jump in production. There is not a company, or designer that has got better. For example


This is the world first book to date and is called the Diamond Sutra, which is an indian text that was translated to chinese in AD400.


There was then a big jump to:

This is the book of psalms in 1940 and this was the first published book in North America. This differs from the image above as it is all in black and white rather than on brown materials.
The next big jump was:
 This is when Benjamin Franklin created the very first print by carving into wood. He became a famous American artist for his style and his work was viewed at the London print shop.
Until the end of the 18th century the only way you could actually print was by using wood cuts but these lacked the finer detail in which are present in our art work now.


Etching was then introduced but to create an image like his you had to complete your images and texts separately and then put them together after. This would take time and effort.


From all of this printing and etching in history came along Bewick, who today still carries on the tradition of carving into wood, but there are other engravers who have found other ways to do it. For example carving into floor tiles. Finally these engraved images from way back to 16th century would now be put into Photoshop to add colour to them.

Text can change an image week 9

Practitioners work in different ways but you always find that the use of words can change the meaning on an image or how people see it. Adding words can also influence or change our emotions/ thoughts about something.
For example,
1) A practitioner that adds words to change the image is Stefan Sagmeister.

Without the text this image would just be a fence with no story behind it, and it would just look like a piece of photography. So to make people understand the meaning of this image and what he was thinking when taking this, he has added a word in front. The word 'trying' says to me that  the fence could be surrounding a prison and its showing that the people inside are 'trying' their best to get out. OR that people are trying to get to the other side as it made be freedom. Without the text you cant actually tell what the image is as your mind doesn't think things through as much.


2) An example of text being used to influence or change emotions;
When you first look at this image you may not understand what its for (without the text), and you dont really feel an emotion for the teenager as it doesn't look like anything is happening to her, but then when the text to the tape and around the image is added your emotion starts to change and you look at the image again and feel sorry for her wanting to help. This proves my theory that text changes emotions because without the text you wouldn't realise that help was needed.

Bibliography- http://www.designboom.com
image from http://muse-of-art.blogspot.com/

Development of creative thought and structure (Week 8)

Developing ideation fluency
There are many different ways in which to express your ideas. These being brainstorms, mind maps, classification, tables, through images or just though words. The way you do it, depends on the type of person you are and how you like to work. If your a more theoretical person then maybe you like to use tables and words, but if you are a visual person then you may use brainstorms or mind maps where you have to physically draw something. The ideas you put down are for your designs and can tell a story. The more ideas you have the bigger the mind map etc will be. The idea of brain storms and mind maps is to see how far your ideas can go by thinking about associations, these would be to do with the specific topic.
Mind maps help an practitioner or anyone to write down there ideas visually so there brain will physically remember whats been written. They help to break down ideas into smaller parts. My thoughts on mind maps are that they are very helpful. I always use these when i am writing down my ideas because i feel its better than writing text in a paragraph. They give me the ability to sketch images around the map too.
A practitioner that is also fond of using brain storms to put down his ideas is Rob Ryan. He creates all of his images through the use of brain storms. I feel that most of his images anyway do look like brain storms themselves. So i think that the idea of brainstorms does inspire him too.


milan+rob+ryan.jpg


Managing a creative environment
Every practitioner has there own working space or studio. They make it their own by putting up their work on the walls around, filling their desk with there art supplies and generally knowing where everything is, makes them feel comfortable.

This is a Disney practitioners workspace. This image shows how they have put up their own work on the walls. I feel that this is stimulating as it would make them proud to see how far they have gone and how much they have improved. You cannot really see how things are arranged on their desk but i can see that it is very full. I would have to store away items to give me a big clear space on my desk to work on.


This image shows the arrangement of art supplies that a practitioner has on their desk. I feel that this is a very good way to sort things because you can see clearly where everything is.

I don't really have anything that i collect, but i do have many books which show artists work and advertisement work. I feel these are important because they help me improve my ideas as i can see whats existent already.


Tuesday 9 November 2010

Development of ideas and structure in moving image (Week 6)

1) 3 act structure
Every film begins as a story board and has to be planned first. If a film didn't have a 3 act structure, this being a beginning, a middle and and end, i don't think it would make sense. The beginning would set the scene, the middle would hold the bulkiness of the ideas and the main events and then the end would bring the whole film together (conclude it).

A recent film in which i will focus on that uses this 3 act structure is 'The life and death of Charlie St Cloud'. I feel that this movie clearly shows this specific structure. The way its made up is;
beginning: middle: end, but the events that set the whole scene of the film is at the very beginning. Basically in this film, Charlie who is the main character has a little brother and he dies in a car crash, this happens at the beginning. In the middle Charlie visits the same place everyday at noon to play catch with his brother (he imagines him) but then he meets a girl who is in a boat accident, so he travels out to sea to save her and forgets to go visit his brother. This leads you to the end where Charlie saves the girl which becomes his girlfriend and he finally lets his brother go.
Act 1: Act 2: Act 3
Beginning: Middle :End
Death: Dreams: Reality

2) Character design
The character i am going to focus on and create a guide about is Edward Cullen in the Twilight series that's played by Robert Pattinson.

In the films and the books i feel that Edward's character is the protagonist. This makes him the main character that experiences the conflict that arises. There is other characters in Twilight which i feel experiences conflict too but i feel that Edward is the main one. In this story Edward is an example of a good protagonist as all he tries to do is help Bella and reduce the conflict.
The 3 key areas of this protagonist character which i will focus on are; appearance, action and interaction. These will tell me what the character looks like, what he does and how he relates to others and the events in the story.
Guide to character Edward Cullen in Twilight
- Appearance- in this film Edward is a vampire so he has white skin, bright red eyes and appears to look ill all the time. This helps show what his character is all about and which side he is on in this film, as there is two sides, vampires and werewolf's. His identity has to stay a secret though.
- Action- This character looks after his girlfriend Bella, attends a high school and has to fight werewolves, as in this story they different groups don't get on.
- Interaction- The relationship Edward has with Bella is that they are a couple, so their interaction with each other is very close. He also interacts well with his family who are also vampires this is because he has to fight with them and help them out. The only character which Edward doesn't interact well with

Wednesday 27 October 2010

ITAP Lecture work week 5

1) Drawing

Drawing by hand is done by every designer to create ideas, they need to do it. It enables them to create a connection between their hand, eyes and brain. Drawings don't have to be perfect and in detail, they can be little sketched that still give the same ideas. Drawings help designers develop and get better at what they do, because they would draw for ideas not for the art, thats why it doesn't have to be perfect or neat. Leanardo is a designer which creates and puts his thinking on a page through drawing. The drawing doesn't have to be done in pencil either. Designers use different media depending on the mood or the ideas, for example if the ideas had a scary theme a designer may create sketches with black thick lines to get the theme across in those sketches. An example of functional drawings which i will focus on are by Leanardo.


These images show Leonardos work and how he uses sketches to demonstrate ideas.


2)


When designing or sketching the designers brain will split into two ways but it will not be obvious, it just happens and it cant be stopped. it has been said that the right side of your brain when designing acts or thinks like a child. For example it's more spontaneous, curious, easily frightened but likes adventure. This is also the side which makes you take criticism to heart.


The other side is your left and this is very different. this brain is more like an accountant, it's organised, it likes to clarify and quantify and also ask what's useful. your brain changes modes consciously depending on what you are doing. with this the only thing a designer has to be careful with is keeping a fine balance between experimenting and having a direction.


This image to the right shows how the two sides of the brain work together. The right side acting like the child creates an image randomly using media and then the left side asks the questions like what is it, what can it represent etc.

Thursday 14 October 2010

ITAP Lecture work- Week 3

1) Legibility
Text on visual communication pieces are all different. there are some that you can read and some that you can't but this is how its been designed. When artist's design they have to ask themselves many questions and see if it was appropriate. How legible the text is could determine if your product is sold or if for example an application form is filled out. Different ways in which text can be made legible or illegible is colours, e.g yellow on white is illegible. Size of the text makes a difference, for example small text used in a reading book works as its close to your face but small text on a projection screen in a lecture wouldn't work as people at the back won't be able to see it. Finally text over images become illegible. An example which i have researched to evident my point of legibility is the new and old layout of newspapers.

The old newspaper is less legible than the new. The goal or intention of changing the layout of the newspaper is to keep the audience interested in reading their paper, so they want it to be as appealing as they can make it. From the old newspaper to the new they have added images and headlines to get the information across quicker and to make everything more legible. i feel that the editor of the times newspapers '' wants the audience to be knowledgable and have the ability to read a lot of text, but to also see messages in images, so this could be teenagers to adults. The message given off with the two newspapers is that they are made more legible and interesting by having less text. For example in the old paper its made to be less legible because the text is too small and is in boxes with know spaces. Whereas the new paper is more legible because there is more space between text and the size of important information is bigger. The media that is used on the new newspaper is photographs, to give information through images.


2) Researching the practitioner
Any practitioner is inspired by other artists work or how they work. i have researched the artist Henri Matisse and i found that he was inspired by a lot of other artists such as Van GoughPaul Cezanne and Gauguin. I looked into his work that was inspired by Van Gough.


This is Van Gough's painting of sun flowers and Henri Mattisse attempted the same image but in a different technique of applying the acrylic.
This shows how he was inspired, because he got the idea from Van Gough but then edited into his own style.


Bibliography
http://www.worldart.com.au/vincent-van-gogh-part-1/
http://www.michaelarnoldart.com/Henri%20%20Matisse%20Artist.htm
http://magculture.com/blog/?p=374